Triggering Flipside actions

The FlipsideActions component can be used to trigger a number of Flipside's internal actions via Unity events. It can also be used to listen for internal Flipside events and trigger actions in your set when they occur.

You can add a FlipsideActions component to any object in the scene, and only one is required in the scene which can be shared between all components that you want listening for or triggering events in Flipside, however, there's no harm in having multiple instances too.

Triggering actions in Flipside

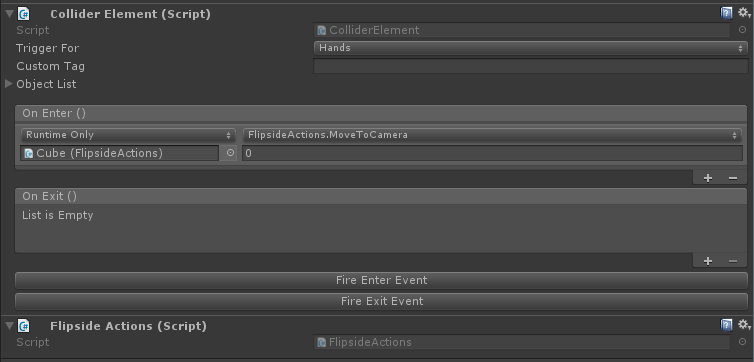
Here are the steps to trigger a camera move:

  1. Add a ColliderElement to an object on your set. When this is touched, it will trigger a camera change in Flipside.
  2. Add a FlipsideActions component to your scene.
  3. On the ColliderElement, click the + under the OnEnter event, then drag the FlipsideActions component into the newly-created empty slot.
  4. In the dropdown that says No Function, choose FlipsideActions.MoveToCamera.
  5. Set the camera number to be whatever camera you want in to move to, starting with 0 for the first camera.

Here's how it should look once it's all setup:

FlipsideActions component

Triggering actions in your set from internal Flipside events

Here are the steps to trigger an event in your scene when an internal action occurs in Flipside:

  1. Add an AudioSource component to your scene.
  2. Next, add a FlipsideActions component to your scene.
  3. Click the + under the OnDisplay event on the newly-added FlipsideActions component.
  4. Drag the AudioSource into the newly-created empty slot.
  5. In the dropdown that says No Function, choose AudioSource.PlayOneShot.
  6. Assign an audio clip to be played when the event occurs.

In Flipside, you should hear your audio clip play whenever the set is finished loading and fades into view.

You can trigger actions in your sets on a number of internal Flipside events. For a full list, see the FlipsideActions component reference.


Next: Creating chairs and teleport targets

Edit this page.
This documentation was generated by the My App Documentation Project. We're always open to new contributions *wink* *wink*